
ElasticSearch is flexible and powerful open source, distributed real-time search and analytic engine. Using a simple set of APIs, it provides the ability for full-text search. Elastic search is freely available under the Apache 2 license, which provides most flexibility.


This article will help you for configuring ElasticSearch Multi Node Cluster on CentOS, RHEL, Ubuntu and Debian Systems. In ElasticSearch multi node cluster is just configuring multiple single node clusters with same cluster name in same network.
Network Scenerio
We have three server with following ips and host names. All server are running in same LAN and have full access to each other server using ip and hostname both.
  192.168.10.101  NODE_1
  192.168.10.102  NODE_2
  192.168.10.103  NODE_3
Verify Java (All Nodes)
Java is the primary requirement for installing ElasticSearch. So make sure you have Java installed on all nodes.
# java -version

java version "1.8.0_31"
Java(TM) SE Runtime Environment (build 1.8.0_31-b13)
Java HotSpot(TM) 64-Bit Server VM (build 25.31-b07, mixed mode)
If you don’t have Java installed on any node system, use one of following link to install it first.
Install Java 8 on CentOS/RHEL 7/6/5
Install Java 8 on Ubuntu
Download ElasticSearch (All Nodes)
Now download the latest ElasticSearch archive on all node systems from its official download page. At the time of last update of this article ElasticSearch 1.4.2 version is latest version available to download. Use following command to download ElasticSearch 1.4.2.
$ wget https://download.elasticsearch.org/elasticsearch/elasticsearch/elasticsearch-1.4.2.tar.gz
Now extract ElasticSearch on all node systems.
$ tar xzf elasticsearch-1.4.2.tar.gz
Configure ElasticSearch
Now we need to setup ElasticSearch on all node systems. ElasticSearch uses “elasticsearch” as default cluster name. We recommend to change it as per your naming conversation.
$ mv elasticsearch-1.4.2 /usr/share/elasticsearch
$ cd /usr/share/elasticsearch
To change cluster named edit config/elasticsearch.yml file in each node and update following values. Node names are dynamically generated, but to keep a fixed user-friendly name change it also.
On NODE_1
Edit elasticsearch cluster configuration on NODE_1 (192.168.10.101) system.
$ vim config/elasticsearch.yml
  cluster.name: TecAdminCluster
  node.name: "NODE_1"
On NODE_2
Edit elasticsearch cluster configuration on NODE_2 (192.168.10.102) system.
$ vim config/elasticsearch.yml
  cluster.name: TecAdminCluster
  node.name: "NODE_2"
On NODE_3
Edit elasticsearch cluster configuration on NODE_3 (192.168.10.103) system.
$ vim config/elasticsearch.yml
  cluster.name: TecAdminCluster
  node.name: "NODE_3"
Install ElasticSearch-Head Plugin (All Nodes)
elasticsearch-head is a web front end for browsing and interacting with an Elastic Search cluster. Use the following command to install this plugin on all node systems.
$ bin/plugin --install mobz/elasticsearch-head
Starting ElasticSearch Cluster (All Nodes)
As the ElasticSearch cluster setup has been completed. Let start ElasticSearch cluster using following command on all nodes.
$ ./bin/elasticsearch &
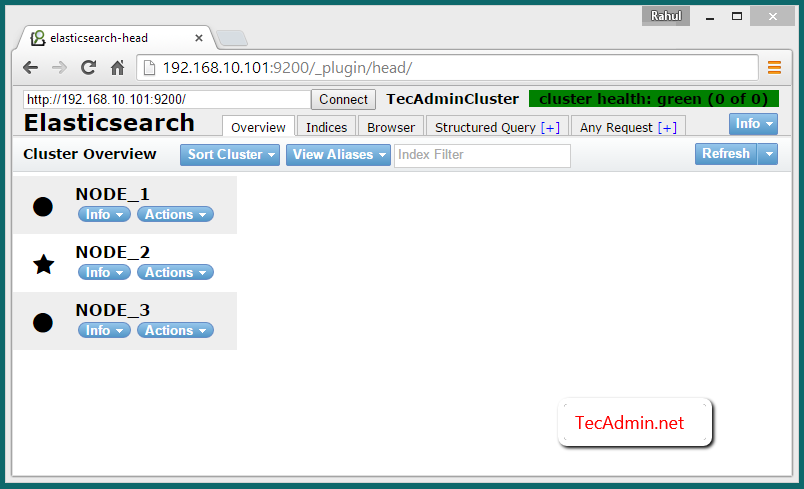
By default elasticserch listen on port 9200 and 9300. So connect to NODE_1 on port 9200 like following url, You will see all three nodes in your cluster.
http://NODE_1:9200/_plugin/head/
Verify Multi Node Cluster
To verify that cluster is working properly. Insert some data in one node and if the same data is available in other nodes, it means cluster is working properly.
Insert Data on NODE_1
To verify cluster create a bucket in NODE_1 and add some data.
$ curl -XPUT http://NODE_1:9200/mybucket
$ curl -XPUT 'http://NODE_1:9200/mybucket/user/rahul' -d '{ "name" : "Rahul Kumar" }'
$ curl -XPUT 'http://NODE_1:9200/mybucket/post/1' -d '
{
    "user": "rahul",
    "postDate": "01-16-2015",
    "body": "Adding Data in ElasticSearch Cluster" ,
    "title": "ElasticSearch Cluster Test"
}'
Search Data on All Nodes
Now search same data from NODE_2 and NODE_3 and check if same data is replicated to other nodes of cluster. As per above commands we have created a user named rahul and added some data there. So use following commands to search data associated with user rahul.
$ curl 'http://NODE_1:9200/mybucket/post/_search?q=user:rahul&pretty=true'
$ curl 'http://NODE_2:9200/mybucket/post/_search?q=user:rahul&pretty=true'
$ curl 'http://NODE_3:9200/mybucket/post/_search?q=user:rahul&pretty=true'
and you will get results something like below for all above commands.
{
  "took" : 69,
  "timed_out" : false,
  "_shards" : {
    "total" : 5,
    "successful" : 5,
    "failed" : 0
  },
  "hits" : {
    "total" : 1,
    "max_score" : 1.0,
    "hits" : [ {
      "_index" : "mybucket",
      "_type" : "post",
      "_id" : "1",
      "_score" : 1.0,
      "_source":
{
    "user": "rahul",
    "postDate": "01-16-2015",
    "body": "Adding Data in ElasticSearch Cluster" ,
    "title": "ElasticSearch Cluster Test"
}
    } ]
  }
}
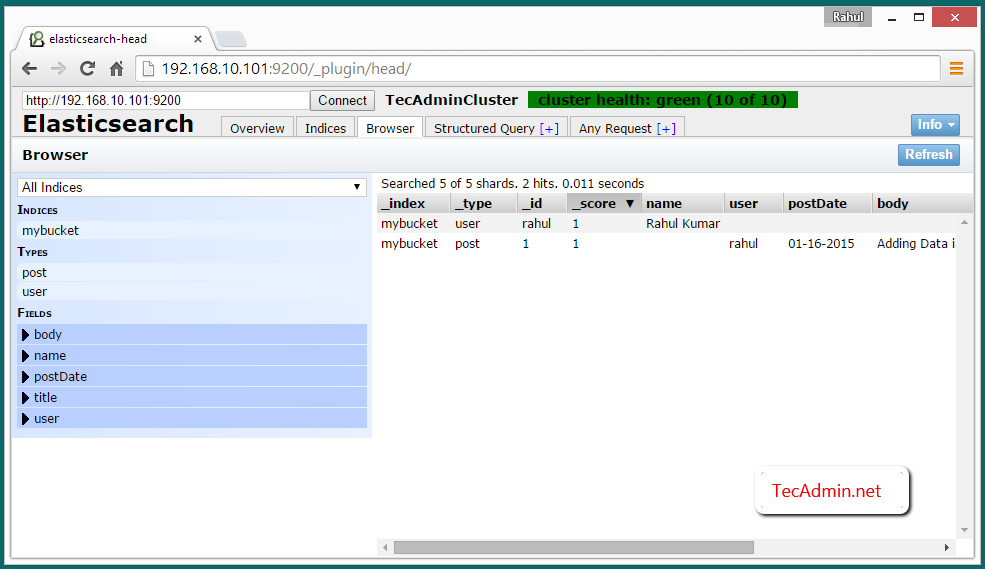
View Cluster Data on Web Browser
To view data on ElasticSearch cluster access of elasticsearch-head plugin using one of cluster ip at below url. Then click on Browser tab.
http://NODE_1:9200/_plugin/head/
8 Comments
Hi Rahul sir,
i had a doubt about the first step ,assigning the ip addresses to the nodes,
should we add the following ip to hosts file in etc/hosts directory??
Can you please help me on this.
Thank you in advance
Great write up! Thank you very much! Going build this; I shall provide an update once completed.
Do you also have a logtash and kibana write up to above article?
Hi ı wonder the performance of 3 or more nodes ?
Hi Rahul,
One QQ .. How can we setup ES cluster to get access to it with a single URL instead of node specific URL?
Note – If current master fails this URL should be able to automatically re-point to newly elected master.
Regards,
Atul
Hi Rahul,
I have one doubt in this tutorial.
Where is the relation in between all these three nodes?
.yml files are different. ES runs on different host:port and how come data inserted on one host be available to others? Please specify the setting which ensures the relation/connection between these 3 nodes. I think that is missing.
br,
Sunil
Hi Sunil,
ES automatically works on cluster environments. You just need to keep cluster.name same on all nodes you want to replicate. When ES started, it automatically searches for all nodes with same cluster.name on local network and start replication automatically.
Hi Rahul,
Thanks for quick reply.
I have single host ready for environment set up.
1) Can I create 2 data nodes and 1 master node n single host?
2) How much ES instaces I need to run? If more than 1 instance is required
then how can I run those?
I use command [user@xxx bin] $ sudo service elasticsearch start
3) Do I need to create more elasticsearch.yml example elasticsearch.0.yml, elasticsearch.1.yml and so on?
Also please share steps to secure ES behind nginx.
thanks,
Sunil
Hi Rahul,
I have started cluster with one master node and 2 data nodes.
However when I do curl http://localhost:9200/_nodes/process?pretty, It shows only a master node and 1 data node. It doesn’t show second data node as below. Why so?
{
“cluster_name” : “presit-elasticsearch”,
“nodes” : {
“bC83hVbgRaiHuPrOn133dA” : {
“name” : “presit-data-node-1”,
“transport_address” : “inet[/xx.xxx.xx.xx:9300]”,
“host” : “hostname1”,
“ip” : “xx.xxx.xx.xx”,
“version” : “1.5.2”,
“build” : “62ff986”,
“http_address” : “inet[/xx.xxx.xx.xx:9200]”,
“attributes” : {
“master” : “false”
},
“process” : {
“refresh_interval_in_millis” : 1000,
“id” : 10278,
“max_file_descriptors” : 65535,
“mlockall” : false
}
},
“zjPvIyRpSYGUrRg1-ZX5nw” : {
“name” : “presit-master-Node”,
“transport_address” : “inet[/xx.xxx.xx.xx:9300]”,
“host” : “hostname1”,
“ip” : “xx.xxx.xx.xx”,
“version” : “1.5.2”,
“build” : “62ff986”,
“http_address” : “inet[/xx.xxx.xx.xx:9200]”,
“attributes” : {
“data” : “false”,
“master” : “true”
},
“process” : {
“refresh_interval_in_millis” : 1000,
“id” : 22738,
“max_file_descriptors” : 65535,
“mlockall” : false
}
}
}