This tutorial will help you to install and configure Fail2ban on your CentOS and RHEL 8 and Fedora systems. In this article, you will also learn how to add any specific service to monitor under fail2ban.
Step 1 – Install Fail2ban on CentOS 8
First of all, install epel-release package to configure EPEL yum repository on your CentOS 8 system. After that, install the Fail2ban rpm package using the following commands.
sudo dnf install epel-release
sudo dnf install fail2ban
Step 2 – Configure Fail2ban
Fail2ban keeps configuration files under /etc/fail2ban directory. but we need to create a copy of this file as jail.local.
sudo cp /etc/fail2ban/jail.conf /etc/fail2ban/jail.local
sudo vi /etc/fail2ban/jail.local
Now we need to make necessary changes in jail.local file to create ban rules. Edit this file in your favorite editor and make changes in [DEFAULT] section.
1 2 3 4 5 6 7 8 9 10 11 12 13 14 15 16 | [DEFAULT] # "ignoreip" can be a list of IP addresses, CIDR masks or DNS hosts. Fail2ban # will not ban a host which matches an address in this list. Several addresses # can be defined using space (and/or comma) separator. ignoreip = 127.0.0.1/8 192.168.1.0/24 # "bantime" is the number of seconds that a host is banned. bantime = 60m # A host is banned if it has generated "maxretry" during the last "findtime" seconds. as per below # settings, 2 minutes findtime = 5m # "maxretry" is the number of failures before a host get banned. maxretry = 5 |
Step 3 – Protect SSH/SFTP
After completing default configuration, go down in the same file jail.local and update [ssh-iptables] section as below.
[ssh-iptables]

enabled  = true
filter   = sshd
action   = iptables[name=SSH, port=22, protocol=tcp]
           sendmail-whois[name=SSH, dest=root, [email protected], sendername="Fail2Ban"]
logpath  = /var/log/secure
maxretry = 3
Step 4 – Protect FTP
Let’s protect your FTP (vsFTPd) server, Find the below entry of [vsftpd-iptables] section and make changes as below. If you are not using vsFTPd, you can skip this section.
[vsftpd-iptables]

enabled  = true
filter   = vsftpd
action   = iptables[name=VSFTPD, port=21, protocol=tcp]
           sendmail-whois[name=VSFTPD, [email protected]]
logpath  = /var/log/vsftpd.log
maxretry = 5
bantime  = 1800
Step 5 – Restart Service and Test
After making all the changes save your file and restart Fail2ban service using the following command.
sudo systemctl start fail2ban.service
sudo systemctl enable fail2ban.service
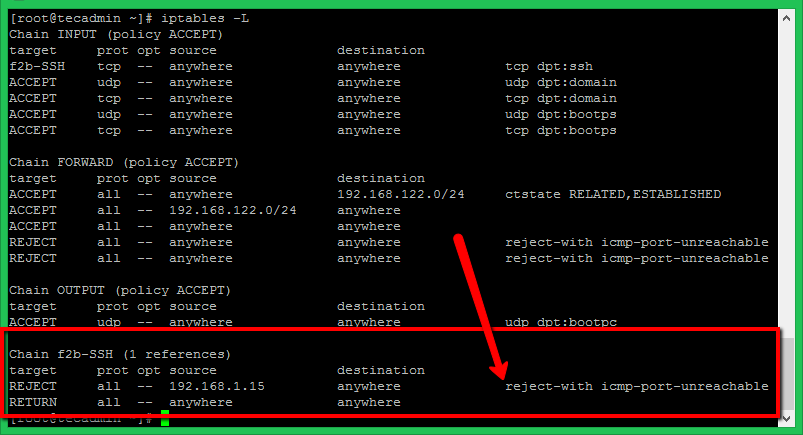
For testing purposes, I have tried SSH with the wrong credentials from a different machine. After three wrong attempts, Fail2ban blocked that IP via iptables with reject ICMP. You can see the rules in iptables after blocking the IP address as below. For SSH only systems, make sure to have SSH access from another IP before making these tests.


1 Comment
This setup won’t work with Fedora 32. They have changed from iptables to nftables. You need to make the change in the config files reflecting that. I use 3 files in jail.d they are listed below. Remember, the files are parsed alphabetically.
00-firewalld.conf
# This file is part of the fail2ban-firewalld package to configure the use of
# the firewalld actions as the default actions. You can remove this package
# (along with the empty fail2ban meta-package) if you do not use firewalld
[DEFAULT]
banaction = firewallcmd-rich-rules[actiontype=]
banaction_allports = firewallcmd-rich-rules[actiontype=]
00-systemd.conf
[DEFAULT]
#banaction = firewallcmd-ipset
banaction = nftables-allports
local.conf
[DEFAULT]
bantime = 3600
maxretry = 3
#sender = [email protected]
#destemail = root
#action = %(action_mwl)s
[sshd]
enabled = true